Siloing means structuring your website’s menus and links. Being well-organized helps you get indexed by search engines. Here’s how to do it yourself!
Want to receive this report in a PDF? Click Here
1) What is a silo?
A “silo” refers to a way of structuring your website with pages, posts, categories and menus so that the site reflects a well-organized information store.

2) What are the benefits of siloing?
A well siloed website can be found and indexed more easily by Google and the other search engines. This results in better rankings and more traffic from those search engines.
3) How to Silo Your Website for Better Rankings and More Traffic
a) Get Keywords or a List of Topics
Probably the first and best thing you should do to silo out your traffic, is to identify the best keywords under which to bring the traffic and organize your website.
The best way you can do that, if you don’t have a list of keywords already, is go to the Google Keyword Planner or some other suggest tool to get keyword ideas.
Depending on your strategy, find a good list of keywords. You may be looking for keywords that the Keyword Planner says have a higher search volume.
Or perhaps your criteria would involve higher CPC value if you’re looking to make an Adsense site (that way you’ll make more money with higher paying clicks.)
Or, you may want to find longer tail keywords that are “off the beaten path” so to speak, to find a deeper niche. You can do that easily by typing the beginning of a phrase into the Google search box and seeing what suggestions come up.
All the major search engines have “suggestion” capability, so you can query Google, Yahoo and Bing the same way to get suggestions and ideas for longer tail keywords.
The only problem with getting keyword suggesions is that they do not come with search data already attached, you’d have to look them up elsewhere to find out what the global monthly search volume is, the CPC and so forth.
You might not even be concerned with that extra data, depending upon your goals with your keywords.
For an example website silo, I have chosen the topic “German Shepherd”. Here is my list of keywords that I will be siloing with:

These keywords all came from the Keyword Planner and they all have a good search volume attached, so I picked these from among the other ones offered in the planner.
b) Organize your Keywords and Topics
Now that you have your new list of keywords or topics, we can organize them into blocks that the search engines will be able to understand.
You want your information and topics to be arranged and organized nicely in order for the search engines to be able to know what your website is about and how it can find the information that you are exposing to the world.
The best way to do this is by “silo”-ing your website using these techniques.
So, you should start by ordering your list in the appropriate manner so that the information is organized properly, with some keywords serving as head topics and others as sub topics to those main topics.
After some work, I’ve ended up with this siloed structure:

As you can see, I’ve capitalized all the terms to make them look nice, and I’ve changed the order to make some as sub-topics underneath others which are set as main topics. The hyphen (-) before the term indicates it is a sub-topic of the preceding main topic.
I will also now add one utility section to this silo to make it a complete website –


This now shows a pretty good comprehensive website structure, presented as an information store with all information nested nicely underneath topics and subtopics.
Now, we need to implement this structure onto a real blog.
c) Transfer this structure to your website
In this example, we will assume you are using WordPress to build your website. If you are not using WordPress to build your website, we highly recommend that you do so. WordPress has proven to be the most effective platform for building traffic-getting websites, for many reasons, not the least of which is that you can easily build an effective, siloed blog from scratch, and that’s what we’re showing you how to do today.
Now, you are going to want to decide of all those topics, which ones warrant a single page to be built, and which topics may have multiple posts aggregated underneath. For example, “German Shepherd Puppies For Sale In Michigan” may be a single page in which a particular business’ information is presented.
Whereas “German Shepherd Facts” sounds more like a topic that you might add something new to every day — for that kind of keyword, you want to make a category out of it so you can put multiple stories under that content.
I’ll decide like this:
Home – (aggregated – show post snippets)

“Page” means that you will create one page for that topic and put all the information on that page.
“Aggregated” means that you will create a Category for that topic, and then have the ability to create multiple pieces of content (Posts) that will be filed under that Category, and will show up as ‘aggregated’ posts under that page with the titles and snippets from the latest content displayed in a listing. On aggregated pages the user can click on the title of any post to go directly to that individual post content.
Setting up your website this way not only makes it easier for visitors to browse and find the things they want — it also makes it easier for Google and the other search engines to catalogue and spider your website. In fact, organizing your website in this way more or less reflects the information stores contained within those search engines so you’ll find your information fitting like a glove with the way the search engines store their own information.
d) Set Up Your Blog’s Permalinks Correctly
In order for siloing to work effectively, you must set up your permalinks to reflect “post name”. To do this, log in to the WP-Admin section of your blog and go to Settings->Permalinks and select “post name” from the options and then click “Save Settings”.
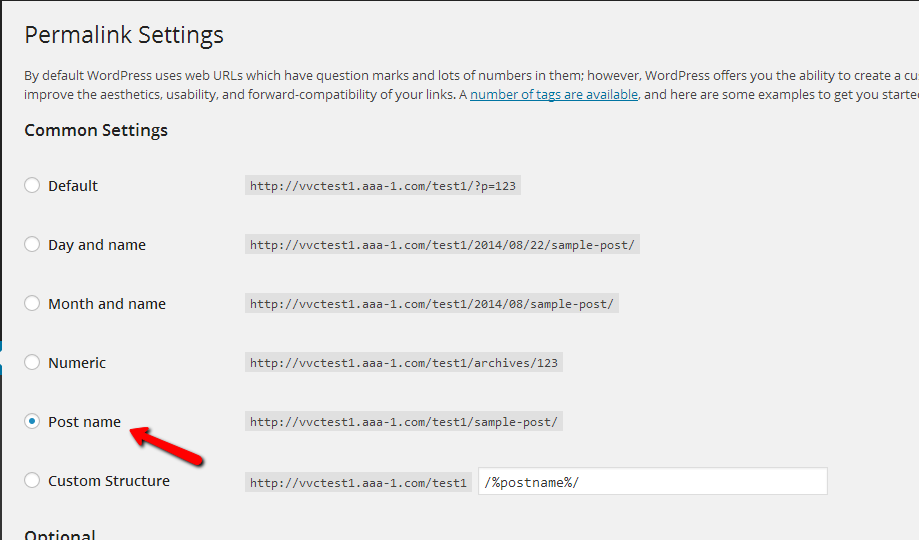
This has the effect of changing your blog’s urls from something like
and makes it look more like
This is a very important, required step.
e) Create the Pages
Now, you need to go through the list and choose just the ones you’ve marked as “Page”, and create those pages individually. Here’s how:
Log in to the WP-Admin section of your blog and go to Pages->Add New and when the ‘new page’ form opens, put in the keyword itself as the title, and add your content to the page and save it.
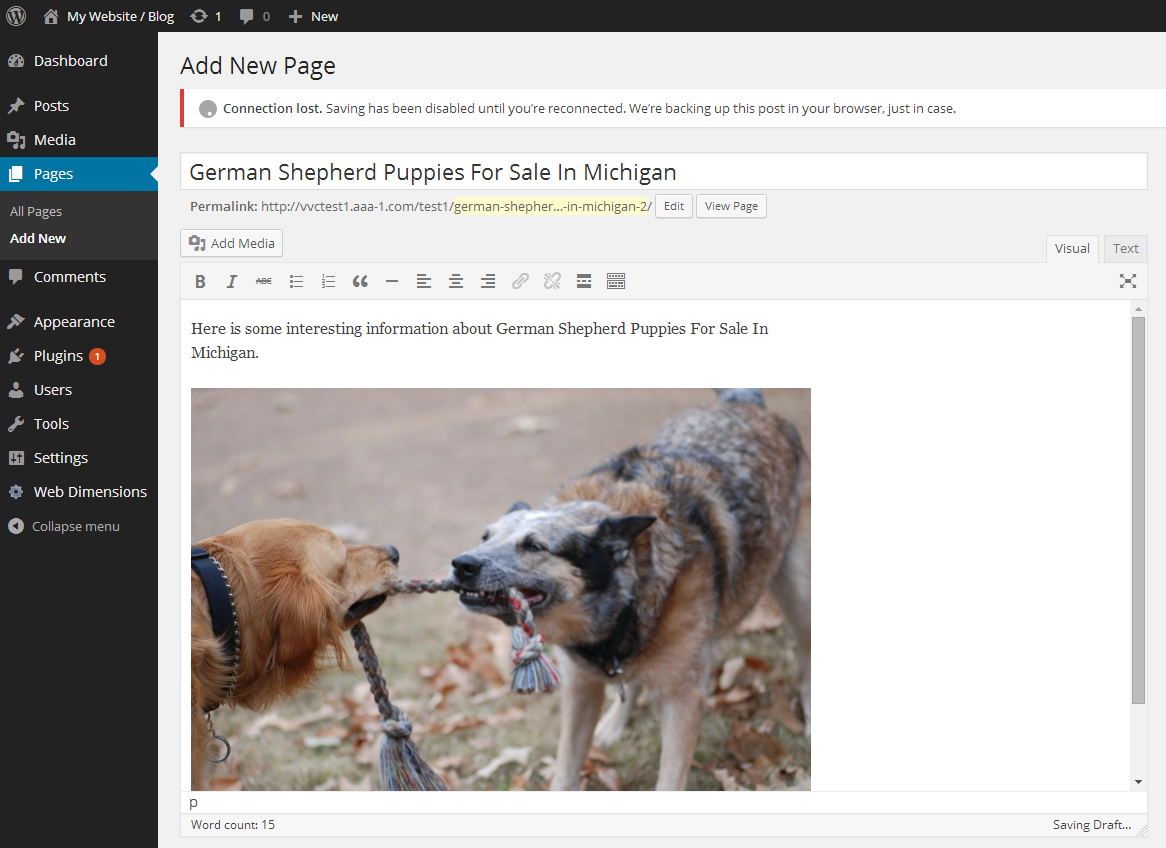
Repeat this step as many times as necessary until you have create a page for every keyword you’ve marked as “Page”. Again, make sure you use the keyword itself as the title of the page, and put some relevant content into the page before saving.
(Relevant content consists of some text about the keyword, including the keyword itself at least once. Also provide interesting information and perhaps an image and/or a Youtube video. Choose image or video that relates specifically to the keyword for this section. Also, don’t forget to put the keyword in a phrase into the “Alt” value in your image files if you use an image on the page.)
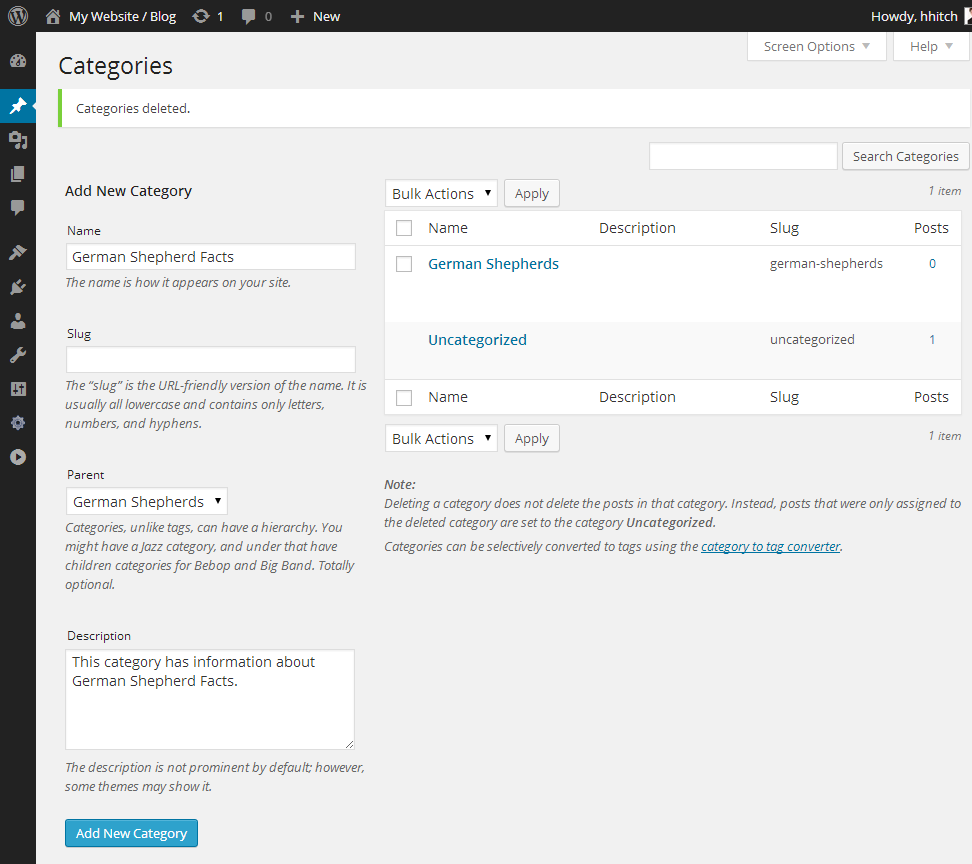
f) Create the Categories
Now please go through your keyword list and pick just the ones marked as “Category” or “aggregated”.
For each one of those, you will now create a Category on WordPress. To do this, navigate to Posts->Categories in the Wp-Admin section of your blog.
Copy and paste or type your keyword into the “Name” field under “Add New Category. If you like, you can enter a nice description of the category – this can help with your rankings if you provide relevant information about the keyword when saving it as a category. Don’t worry about the “Slug” value because it will be generated automatically. Depending on the structure you are trying to create, you may want to select a previously created category as a “parent” for yournew category (main topics can be parents of subtopics.) After typing or pasting in the keyword, you can just hit enter to save or click the “Add New Category” button at the bottom to save the category.
Do this for every keyword in your list that’s earmarked as an aggregated category.
g) Create the Menu
In order for your visitors (as well as the search engines) to find their way around your site, you should implement a navigation menu. The navigation menu serves two purposes – first, it provides a uniform set of site interlinks so people can click around and get to the things they want. Secondly, the site menu sits at the top of the site and communicates to Google and the other search engines the exact structure you want it to see – with top links to sub-topics, and especially for aggregated topics this provides a very convenient top-down spidering structure for Google and the others. This top-down information organization results in much better ability for those search engines to index and arrange your website’s information in a way that suits their database-like way of thinking.
To create the navigation menu, go inside your WP-Admin section to Appearance-Menus. You may already have a menu object waiting to receive the bits that become the entries in the menu. But if not, please click “create a new menu” to do just that – you have to have a menu to start out with in order to add entries to. If you don’t have one, just create one. After the menu is created, you populate it with items on your blog that you’ve created previously.
To populate your menu with items, you find the items on the left hand side, select them and click “Add to Menu”. After that appear on the right hand side, you drag and drop them all into the order you want, and it should reflect exactly the keyword list you’ve created above.
You’ll notice that there are several different kinds of objects you can choose to add to your menu – of course the static pages are called “Pages” and the categories are called, well, “Categories” 🙂 Pick the appropriate object based on the item in your list, whether you’ve created it previously as a page or as a category and add it to the menu as just that.
When you are finished, you should have your menu looking something like this:
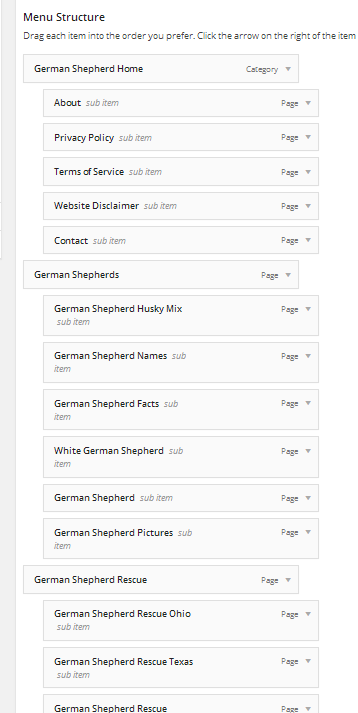
Be sure to click “Save Menu” and then – you’re almost done.
The last step is to make sure that your new menu shows up in the right place on your blog. To do this, on the menu admin page, look for “Menu Settings – Theme Locations”. Under “Theme Locations” make sure “Primary Navigation” has its checkbox checked, and then click “Save Menu”.
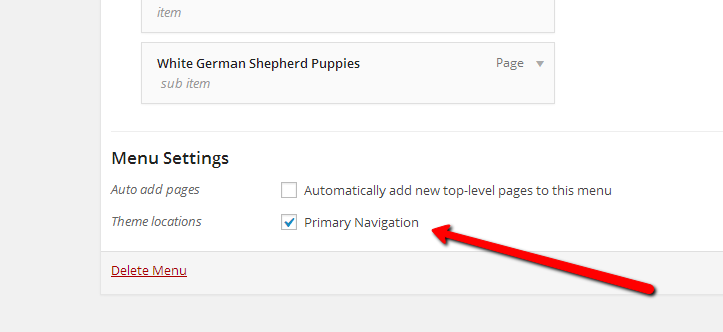
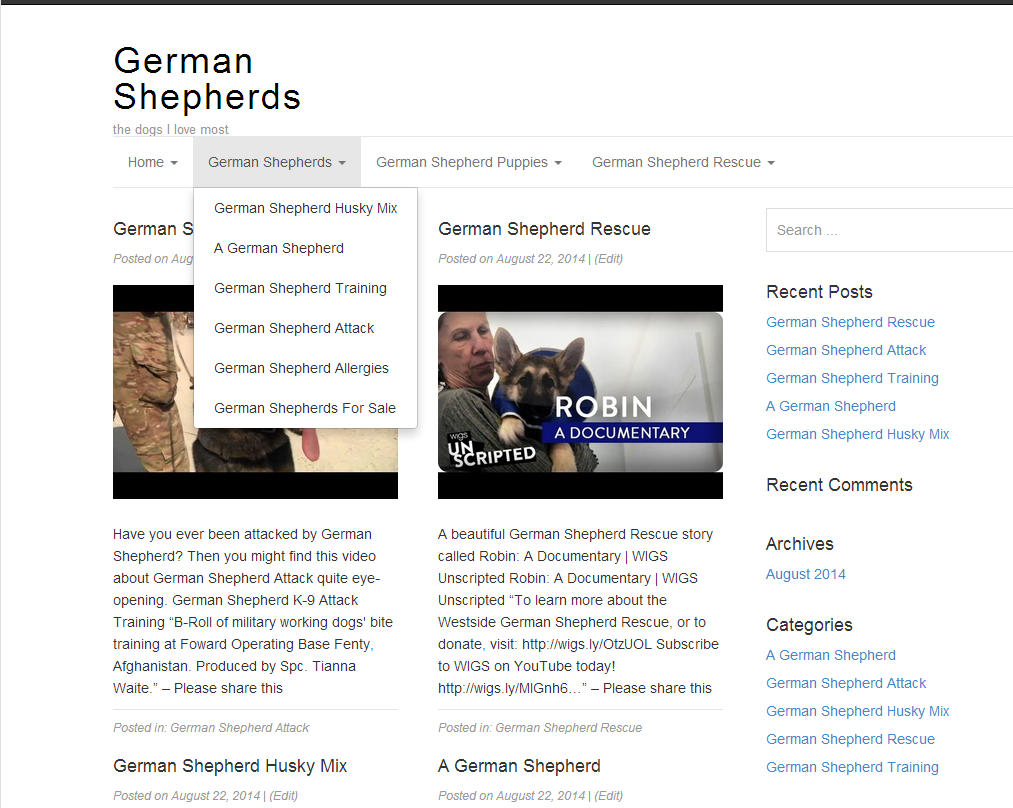
Now you can be sure the menu will show up in the right place across your entire website.
h) Tie Up Loose Ends
There are a couple of other things you’d better make sure you do as well, to be fully siloed and ready to be indexed by Google.
Don’t forget to go inside your WP-Admin section to Settings-General and set the main title, which should be closely related to, if not exactly your main keyword. Set the tagline to be a short, descriptive phrase about the keyword but not necessarily containing the keyword.
We recommend using a good SEO plugin such as All-in-One SEO or something similar to make sure the titles of all your posts get a unique title and so forth. Fill those plugins’ settings out completely.
We also recommend Google XML Sitemaps plugin to make sure you get spidered properly.
That’s not the end of it either 🙂 but it’s probably enough for this report, so we’ll leave it at that for now.
Conclusion
That’s it – you’re done! Of course, you are going to need to create some post content under those categories – because that’s how you get your website to look really good with content appearing under each aggregated section. Otherwise your blog will just show a lot of “Nothing Found” messages. But once you’ve filled out some content (posts) under each category your blog will be looking super good.
And it will be ready to get indexed and found (and server in the serps!)
I hope this report has been of some value to you. Please don’t hesitate to get in touch at support@instantcontentcurator.com with any questions or comments.
Try our awesome Keyword Tool and Silo Designer/Generator ICC Keyworkz!